I started by searching Ham library for a book that would provide idiot-proof instructions. Surprisingly I found only one that even mentioned papier mache, and as it involved cutting and interweaving layers of precise triangles of coloured card, I wasn't optimistic. The fact that I renewed the loan 3 times without tackling the project didn't bode well.
Maybe the solution lay in YouTube videos? I watched a number and felt rather dispirited that they were mostly aimed at the toddler+ age group, and even so looked rather difficult. There seemed to be a key choice of method: either soak a mass of paper strips in flour and water (or switch the flour for wallpaper paste, which I didn't have) and squeeze the water out until you had a massive clump to mould into shape; or take each strip of paper and quickly soak it in flour and water, sweep off the excess gloop with your fingers and lay it across whatever you were using as your mould. The second option seemed likely to produce a less lumpen end product, so I plumped for that.
Having prepared my strips of paper - twice, as I reckoned the first batch was too wide - I needed to find a suitable bowl to use as a mould. I'd thought that would be easy, but it wasn't. Most had either a pronounced lip or feet on the base, which I doubted would translate well once covered in gooey paper. Eventually I found a plain metal one, together with an old plastic bowl for mixing the flour and water. I covered the metal bowl in cling film to make it easier in due course to free it from the papier mache, put it over a glass to keep the rim clear of the table, set the most appropriate YouTube video going, and I was ready to start:
The first strip of paper went on easily, although it became harder to keep it all smooth and wrinkle-free as I tried to cover the whole surface while using unbroken long strips:
Eventually I completed the first layer. As you can see, it wasn't exactly a thing of beauty:
According to the video, it had to dry out completely, over several days if necessary, before I could add another layer - and it would need at least 4 layers. Another video said the papier mache should be about 1cm thick but I decided I didn't need or want such a chunky bowl, and anyway at the rate I was going, that would take months. Luckily the weather was hot and I was working upstairs, so it only took a couple of weeks to finish this stage:
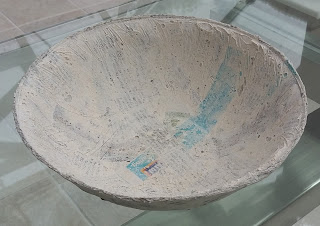
It was now ready to be trimmed and eased off the metal bowl:
Removing it from the bowl was a bit fiddly, as the cling film - which I'd hope to use to pull it off - tore as soon as I applied any force. I gingerly used a plastic palette knife, working it around the rim, and suddenly it came free. I rather liked my new bowl in its raw state and it almost seemed a pity to paint it, but that was a requirement of the challenge so it had to be done:
Originally I'd intended to paint it as the open face of a sliced orange or possibly a watermelon, but I decided that was likely to look too bright and garish. I wanted either the effect of waves pitching and swirling, or something delicate. Fortunately with acrylic paint you can always go over it again, so having done a base coat of white to hide the print, I tried painting the inside as a rolling, tossing sea with blues and white. I found it very difficult to achieve that effect within a bowl shape, and I'd already decided - because the bowl was quite shallow - that I wanted the main impact to be on the inside rather than the outside. Perhaps a delicate look would be better?
After a lot of re-working to produce a soft, calm and paler image, it was an improvement overall but was too bland and dull. It needed something to lift it and I remembered I had some silver paint I'd never used before. It's not exactly as I'd like, but for a first attempt I'm reasonably happy with it:
Making something out of papier mache takes much longer than I'd expected, particularly using the layering method, but it's an absorbing process and I love the idea of creating a potentially useful and attractive object out of old newspaper, flour and water. I plan to try it again, maybe using a larger bowl as a mould so that I have more options when it comes to the painting. I'd also like to have a go at using decoupage and varnish rather than painting, using attractive old stamps, bits of maps, etc. A whole new hobby could be opening up....


No comments:
Post a Comment